Monday, June 8, 2015

Fifteen minutes of crafting {polka dot clothespins}

Before I left school for the year I quickly decorated clothespins to use this fall. My first year I covered them in decorative duct tape. That was a pain. This year I just wrote had Niki write my kids' names on them in colored sharpie. That wasn't near enough fun. So for next year I decided I was going to paint them polka dotted! 
It was super simple! I used regular paint from school and an unused pencil.


I made sure to make some of my dots whole and some going off the edges so they looked like "real" polka dots. I let them dry for an hour or two then flipped them over to do the other side.
*Side note* I had them numbered with colored sharpies before I did the polka dots.  My plan is to reuse them, but we'll see how they hold up.
 
What DIY projects are you working for home or school?


Wednesday, June 3, 2015

Goals for June

This has been a pretty crazy year for me, but things are starting to come to a new normal and fall into place. So with things settling in, I have some major goals for June and the rest of the summer. I just finished my second year of teaching and got my "real" standard license- so I'm good to go there. That means it's time to make some changes in the classroom now that I feel a little bit more like I know what I'm doing and start on my masters! I have big plans for both this summer!

Classroom goals:
1. I MUST create a true reading nook- that means books move, another rug comes in, lamp comes in, and this is all in a different location in my tiny miniature room.
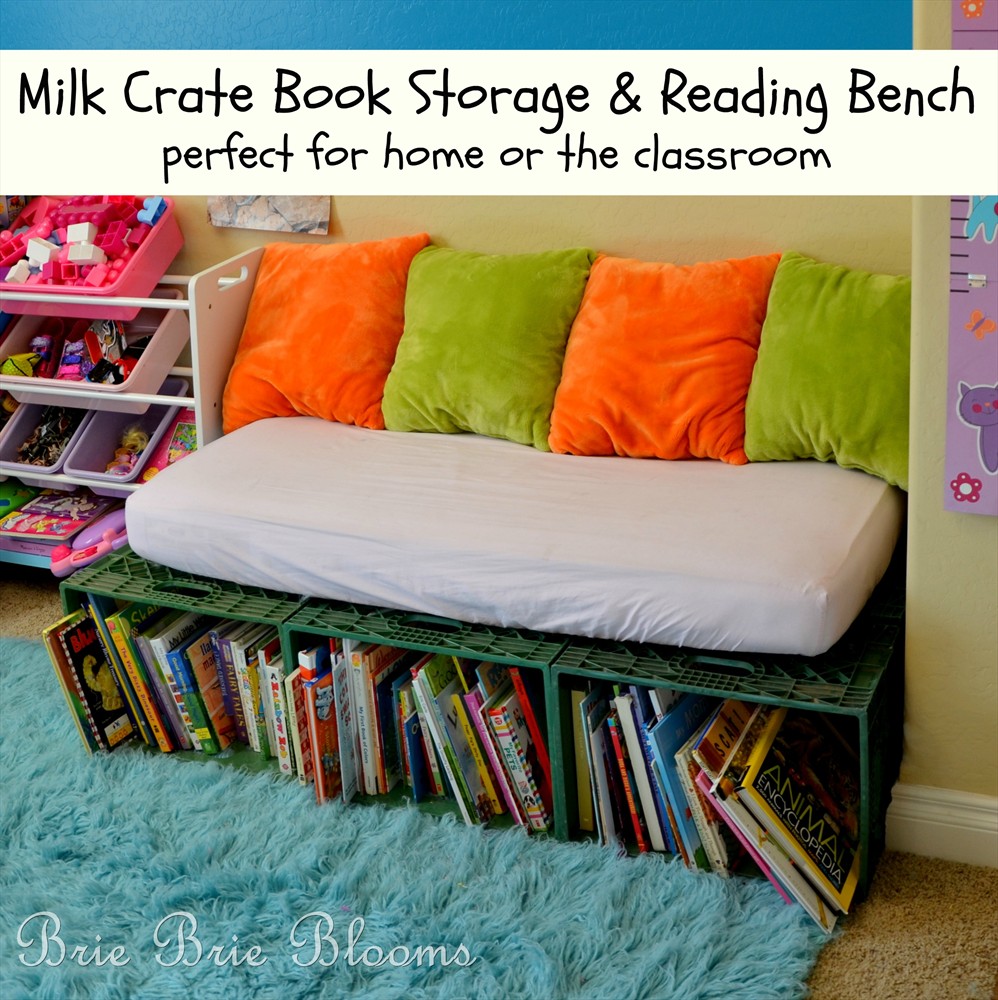
I love the idea of adding a functional little bench like this one {here}

                              Milk Crate Book Storage and Bench (2)

2. Relocate teacher desk to be less obtrusive and perhaps a little more minimalist action in that area as well.
3. New rug! Something bright, colorful, and cheap. Hopefully I can score something when dorm room specials start.
4. Get the tech people to fix my horrible cord situation!

Apartment goals:
1. Redeocrate/Rearrange bedroom. I feel like my bed should be in front of the window now. I was lucky enough to have my great aunt donate two dressers to me. Free = the best!
2. Move in new table. Sell or store current table.
3. Find summer home for Lola (my classroom guinea pig)

Personal Goals:
1. Start master's classess
2. Run 15K with Niki in September- this will mean training these asthmatic lungs all summer.
3. Figure out how to meal plan and stick with it over the summer!

What are you planning to do in June or this summer??


Wednesday, April 29, 2015

Fifteen Minutes of crafting {shower decorations}

I recently volunteered to be in charge of a bridal shower for a family friend. So I went to pinterest for some inspiration. Here's the ideas I wanted to use as a launching point for making my decorations.

Still Love The Twigs With The Simple Glass Vases  The Jute! Love. Just Without Yellow :) 
I love the simplicity of these jars! I plan to use fake  artificial flowers to fill my mason jars.
pin 

centerpieces - I think I've pinned this before but I just love it so much! :) 
pin 
 and here is my gifts and party pinterest board.
I love these jars too! Too bad I have tea lights and not floating candles, but I love how they look!

I didn't and didn't intend to exactly copy either of these, they were just inspiration.
I had some clearance burgandy tealights and a few bigger burgandy candles and bought some burlap, ribbon, lace, and pennants and I was set.

And then I convinced my mom to help to me.

We got our materials and trusty glue gun and set to work wrapping our mason jars in the burlap/lace combo. Worksite: Mom & Dad's kitchen table. Super neat crafter, I am not.

  The burlap with lace ribbon was purchased at Michaels, it was a little pricey at $11.99 per roll, but luckily it was on sale!

 I started my momma on making pretty bows, because she makes them quite well, and I unfortunately cannot make them at all.


 We planned for 8 round tables, and 3 rectangle tables. I don't plan to put jars on two of the rectangle tables, so we are doing 9 jars.

We borrowed some sort of snips from my brother to cut the artificial flowers and it worked like a charm.
It was making me a little crazy that I didn't measure the placement of the burlap on each of the jars, but I went with the theory that they weren't going to be near each other so it would have to be okay.

 My momma also gets credit for the floral arrangements. I, on the other hand, mostly just rock the glue gun.

 I think we worked for probably an hour and had a nice little assembly line going on.

 Little brother, the photographer of this event, forced Momma to pose with her wonderful creation. She did a great job with the flowers!!

 A garden of fakies :)

 We made a bigger jar for the bride's table.
Added lace to the large candles.
8 jars for guest tables.
Decorated an M to display next to their engagement photo and guest book.
(This was another one of mom's great ideas!)

I am super jazzed with how these decorations turned out! We didn't spend a ton of money and didn't have to spend much more than an hour working on them. Thanks for all your help, Mom!


Friday, April 24, 2015

friday faves

We're checking in today to share our five favorite things from this week.

1. The weather is absolutely amazing. Spring is the best, even if we have crazy allergies and look like crap and sneeze like crazy, we still love it!

2. Niki's planner is looking extra lovely these days with her new fascination with stickers and washi tape!

3. Field Trips! Jeans mid week, an afternoon outside...I mean come on! So what if the day was spent at the landfill? The kids loved it!


4. Taking Friday's off! We are all taking today off to head to Faith's Dance competition.

5. Frixon Markers! Niki ordered them on Amazon but didn't love them so I got them and I love them for special occasions in my plan book! Find them on Amazon here.


What are your favorite things this week?
 

Wednesday, April 22, 2015

Setting up my classroom {what it looks like today}

 So after almost two years of teaching my classroom looks totally different, in a good way, I think. This counter acts as my launching area. The bright colored baskets hold my supplies that I need for each day. We run a six day rotation so my baskets are numbered and labeled for the day of the week. My teacher planner sits on the counter in front of my baskets to make sure I stay on track. Things that we accomplish get checked off, if we don't get to them, they get highlighted to remind me to try to fit them in later in the week.


Our rules are displayed on the cabinets above all of my baskets. These were a free download from an adorable blog that I can't exactly remember the name of now...

 When I started this wall had placed that were labeled for each child to have their own space to display work. This past summer I decided to hang a "clothesline" and clip work to it with clothespins. This cuts way down on the time it takes to hang up student work to display.


 My door frame has a collection of the letters we have learned, with the newest letter on the bottom for the kids to touch and say on their way out the door. On the door I have our "I can" statements but not "I can" statements like the common core requires. These are TK I can's. They say things like say my ABC's, use scissors, and count to 100. You can also see in the corner where we store our rest mats.


Our door also houses our morning routine reminder, behavior clip chart, daily schedule, and BEE ticket pockets (we are a PBIS school).  My behavior chart was a free download from the same place as my classroom rules, that I still cannot remember. (sorry).


We also added a good old fashioned classroom whiteboard since we use those a lot in classrooms. Thanks for noticing it's shiny newness :)


 Our aquatic frogs live in the corner above some of our centers and free choice activities, along with some of our stuffies.


The left side is more free choice activities and the right is more center activities, but some are interchangeable. I even have some kids chose to do a center activity during free choice time!


Our calendar is now located on the wall above all of our center storage. Not ideal, I know. I'm working on a better solution for next year. But for now, this is what it is?
Why did she move her calendar to such a bizarre place you ask?
 Oh to make room for this friend, of course!

 I had to loose to sections of shelving and put it in the strangest location, but still worth it!

My classroom library has also expanded into a whole reading nook. I bought a fluffy bath mat and a pillow I found on sale during college move in time. I have big plans for my reading nook for next year. *fingers crossed it works out in reality the way it does in my head*


 My desk area is now in the back corner and is basically a hot mess. My teacher books you can see are lined up in nice big baskets from the Dollar Tree. Our letter people pictures below the alphabet line get filled in as we learn each new letter person.


 And my front door got a new bulletin board set for the beginning of this year and I have decided to leave it that way and change out either side of the door seasonally. Our monthly calendar is on the chart paper.


I'd say over the course of the year I have made both changes and improvements. Hopefully there will be more improvements to come for next school year. 


Wednesday, April 15, 2015

Setting up my classroom {the final result}


 Meet the teacher night had finally come and my room was a ready as it was going to be....
Bring on the TK'ers!


My shelves were filled with all the goodies I had scavenged for all summer. I was under the mistaken impression that my shelves were going to stay looking like this.

And here's the back corner of the room.  Empty shelves, really? I know. Those were left empty on purpose to store the kids' rest mats.

Here is what my calendar area looked like at the beginning of the year. It looks so empty in this picture, but don't worry it looks nothing like this today.


My sister and my nephew were working hard to get my BEE folders ready to go for meet the teacher night so that the kids would have something on their desks when they came. I decided to use sort of a "BEE binder light" for my kids. I didn't think they needed a full BEE binder since they weren't reading and I used a simple behavior tracking method, so I went with the BEE folder.


This banner was a free download I found on pinterest and hung it with yarn, it is still hanging today.

And here's what it looked like from the door way in it's final stages. I scrounged a ridiculous white board easel from the basement and stole it to use in my room since i had no other whiteboard. I had a scavenger hunt on the tables for the kids to look around the room. My desk was so clean and empty- if only it still looked like that.

Next: see what it looks like a school year and a half later.


Wednesday, April 8, 2015

Setting up my classroom {taking shape}

 It was a family affair to put together my classroom. We all spent an entire weekend putting it together the weekend before school started because I wasn't able to get into my room any sooner. Yes, you read that right. We put my room together, as best we could, in one weekend.  It almost had me breaking out in hives!

Some of my decor I bought on sale that summer and some things came from the good old Dollar Tree. I also didn't get my laminating that I had sent out back until that Friday and I had to go pick it up. So as we were putting things up and getting everything set, someone was always cutting laminating. 

 My dad even had to take a little nap break in the middle of our long working weekend.


My birthday bulletin board was turned into a bulletin board out of nothing, I just framed out a space on the wall.
You also may have noticed that there is no whiteboard, no SMARTboard, nothing. That's because there wasn't one. I had one tiny bulletin board...which with my initial layout was located behind my desk so I used it to display our objectives and standards.


 I went with a "no theme" theme, which really is no theme at all. It wasn't in the budget to go out and by all matchy matchy things for the entire room, so it went with bright colors for everything, with a few polka dots and chevron things thrown in there.

 I had tons of garage sale and donated games, toys, and manipulatives...or so I thought until I got them into my room and my shelves still looked bare.
My frog numbers were also a sale purchase and didn't really match my theme of no theme, but the price was right.

 We start the year with nursery rhymes, so that's what went up on my otherwise empty cabinet doors. I got those on sale that summer also. Our daily schedule and clip chart are on the side of our classroom door that we don't use. Those were both from Teachers Pay Teachers, one free and the other a purchase. They match the classroom rules that you can see on the upper cabinets.
The color cars on the wall are Carson Dellosa and were another sale purchase. The rectangle shape posters are from Dollar Tree.

By the end of the weekend my room was looking almost ready for kids. As ready as it was going to be.

Check back for what it looked like for meet the teacher night and what my room looks like today.